
Moving out of a rental property can be stressful, especially if you’re trying to avoid last-minute deductions from your security deposit. That’s why every renter should follow a structured tenant move out checklist. Whether you’re preparing to leave an apartment, house, or shared unit, this guide ensures you cover every critical step.
Why You Need a Tenant Move Out Checklist
Moving out isn’t just about packing boxes. Landlords and property managers expect tenants to return the unit in good condition. A detailed tenant move out checklist helps you:
- Avoid cleaning or damage fees
- Ensure lease compliance
- Streamline the move-out inspection
- Document your efforts to prevent future disputes
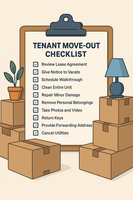
- Download our checklist right here
Let’s break down the steps you should take before handing over your keys.
1. Review Your Lease Agreement
Before you lift a finger to clean or repair, review your lease. Many leases outline specific move-out procedures such as:
- Required notice period (usually 30-60 days)
- Cleaning expectations
- Responsibilities for minor repairs
- Whether carpets must be professionally cleaned
- Whether paint touch-ups are required
Understanding these terms early gives you time to prepare and avoid unnecessary charges.
2. Submit Written Notice to Vacate
Most landlords require written notice before moving out. Even if you’ve discussed it verbally, make sure to:
- Submit the notice in writing
- Include your intended move-out date
- Keep a copy for your records
Some leases specify how notice must be given (email, certified mail, etc.), so follow instructions exactly.
3. Schedule a Pre-Move-Out Walkthrough (Optional but Smart)
A pre-move-out inspection can help you avoid surprises. Ask your landlord if they’ll walk through the unit with you before your official move-out. This lets you:
- Get feedback on what needs cleaning or fixing
- Resolve potential deductions in advance
- Ask questions about the return of your security deposit
4. Clean the Entire Unit Thoroughly
This is one of the most crucial sections of the tenant move out checklist. A deep clean goes far beyond regular tidying. Focus on the following:
Kitchen
- Clean inside and outside of all appliances (oven, fridge, microwave)
- Wipe down cabinets, drawers, countertops, and backsplashes
- Sweep and mop the floors
- Take out all trash
Bathrooms
- Scrub toilets, showers, and sinks
- Remove any mildew or soap scum
- Clean mirrors and fixtures
- Wipe out drawers and cabinets
Living Room and Bedrooms
- Dust ceiling fans, baseboards, blinds, and vents
- Remove all nails or hooks from walls and patch holes
- Vacuum or mop floors
- Wash windows and wipe down window sills
Additional Areas
- Clean laundry machines (if applicable)
- Clear out storage units, garages, patios, or balconies
5. Repair Minor Damage
Tenants are typically responsible for fixing small wear-and-tear issues that go beyond normal use. Examples include:
- Filling small nail holes
- Replacing broken blinds
- Swapping out burnt light bulbs
- Replacing missing smoke detector batteries
Do not attempt major repairs without permission, as this may violate your lease or cause more damage.
6. Remove All Personal Belongings
One of the most overlooked parts of the tenant move out checklist is leaving behind forgotten items. Before you go, double-check:
- Closets, drawers, and cabinets
- The attic or basement (if accessible)
- Outdoor areas like porches or balconies
- Shared or offsite storage units
Landlords are often allowed to charge removal fees for any personal property left behind.
7. Take Move-Out Photos and Video
Before locking the door for the final time, take a full set of timestamped photos and a walk-through video of the unit. Focus on:
- Walls
- Floors
- Appliances
- Bathrooms
- Windows
- Common areas
This serves as your insurance against any wrongful claims about property damage after you’ve left.
8. Return Keys, Remotes, and Access Devices
Don’t forget to return:
- Front and back door keys
- Mailbox keys
- Garage remotes
- Gate fobs or building access cards
- Pool or amenity keys
Failure to return access items can result in replacement charges or delayed security deposit returns.
9. Provide Your Forwarding Address
A forwarding address ensures you receive:
- Your security deposit check
- Final utility bills or refunds
- Any important tax forms or notices
Provide this in writing at move-out or as requested by your landlord or property manager.
10. Cancel or Transfer Utilities
If utilities are in your name, be sure to:
- Schedule shut-off or transfer dates with utility providers
- Take final meter readings (especially for gas, water, and electric)
- Cancel renter’s insurance or transfer it to your new residence
- Notify your internet and cable providers
Avoid paying for services after you’ve moved out.
11. Confirm Security Deposit Timeline and Terms
Most states require landlords to return the deposit within 30 days, along with an itemized list of any deductions. To protect yourself:
- Request a written confirmation of your move-out date
- Ask how the deposit will be returned (check or direct deposit)
- Make sure you’ve met all legal and lease obligations
If your landlord fails to return your deposit or withholds funds unfairly, consider sending a formal demand letter or consulting legal aid.
12. Know Your Tenant Rights and Local Laws
Every state has different laws about tenant move-outs, deposit timelines, and damage claims. Some general rights include:
- The right to a written list of deductions
- The right to dispute unfair charges
- The right to sue in small claims court if necessary
If something feels off, look up your state’s landlord-tenant laws or speak with a housing advocate.
Tenant Move Out Checklist Summary
Here’s a quick recap of everything you should do before you move out:
| Task | Description |
|---|---|
| Review Lease | Understand your obligations for cleaning, repairs, and notice. |
| Give Notice | Submit written notice with proper lead time. |
| Schedule Walkthrough | Request an optional inspection to address issues early. |
| Deep Clean | Clean everything from ceiling fans to baseboards. |
| Fix Minor Damage | Patch nail holes, replace bulbs, etc. |
| Remove All Items | Don’t leave anything behind. Check all nooks. |
| Take Photos/Videos | Document the condition of the unit. |
| Return Keys | Don’t forget mail keys, garage remotes, etc. |
| Provide Forwarding Address | Required to receive your deposit. |
| Cancel Utilities | Avoid charges after you’re gone. |
| Confirm Deposit Details | Know your rights and timeline. |
| Know Your Rights | State laws protect your deposit and process. |
What If You Break Your Lease Early?
If you’re moving out before the lease ends, you may face penalties unless:
- You negotiate with your landlord
- You find a qualified replacement tenant
- You’re protected by laws allowing early termination (like domestic violence situations or military service)
Always communicate early and in writing if you’re leaving before your lease expires.
Final Thoughts: Leave on a Good Note
Following a proper tenant move out checklist isn’t just about protecting your deposit—it also helps you maintain a positive rental history. Landlords often provide references for future housing, so a clean exit can benefit you long-term.
By preparing ahead, documenting everything, and respecting your lease terms, you’ll leave on the best possible terms—clean, confident, and deposit-ready.